Tag Archive for: patio

Container Gardens for Butterflies and Hummingbirds

Summer is here, and so are the hummingbirds and butterflies we love to enjoy in our gardens. Even with a small space you can plant blooms in containers to encourage local butterflies and hummingbirds to stop in for a visit. 

For more information on pollinators:

In this post, we will primarily discuss summer plants for pollinators that grow well in containers. If you want to learn more about supporting local birds, bees and butterflies, you may be interested in our posts on hosting native caterpillars, planting for pollinators year-round, or attracting hummingbirds.

This purple pollinator container garden features petunias, angelonia, ageratum and gomphrena (design by Peg Bier, Merrifield Plant and Design Specialist).

Selecting Plants for Your Container Garden

Butterflies and hummingbirds both eat nectar from flowers. Both hummingbirds and butterflies will be attracted to brightly colored flowers whose nectar has a high sugar content.

Butterflies prefer blooms with flat landing pads where they can easily land to sip nectar. Hummingbirds prefer blooms that are accessible by their long beak while still in flight. Every gardener will have their own favorites and plants that they swear by, but here are some popular favorites we all agree on for the summer:

Perennials

  • Agastache
  • Asclepias (Butterfly Weed)
  • Coneflower
  • Coreopsis
  • Gaillardia
  • Gaura
  • Heuchera

Annuals

  • Angelonia
  • Begonia
  • Calibrachoa
  • Crossandra
  • Cuphea
  • Dahlia
  • Fuschia
  • Gomphrena
  • Lantana
  • Pentas
  • Petunia
  • Salvia
  • Zinna

There are many plants to choose from, but you may find that your local hummingbirds and butterflies prefer certain types of flowers.

This pollinator container garden features salvia, angelonia and lantana (design by Peg Bier, Merrifield Plant and Design Specialist).

Container Combinations

When creating a pollinator container, your creativity is just about your only limit. While you will want to use mostly pollinator plants, it is perfectly fine to combine other plants you love into your containers as well. Here are some ideas to get you started!

Fresh Pink and White

This combination of pink and white flowers looks natural while maintaining a curated color combination of pink and white blooms. This fresh, vibrant container combines perennial coneflower and heuchera with annual lantana, angelonia and pentas.

Vibrant Red and Yellow

This container makes use of deep burgundy coleus to bring together the vibrant red and yellow blooms. For this combination, you will need perennial coreopsis and euphorbia with annual dahlia and coleus.

Bold Multicolor

This bright, bold container includes salvia, crossandra, gomphrena, cleome and portulaca.

Herb Container Garden Collection

Creating Herb Gardens with Containers

Peg Bier, Merrifield Plant Specialist

There is value in seeing new possibilities when something you cherish dies. In this case, I recently had to remove a very old, large oak just off my deck. Where shade was present before, now there is sun. When the oak tree stood, my herb garden was in what I call my “South 40,” some distance from my kitchen, but the removal of this old tree has given me the opportunity to try moving it to a new location.

Now, in place of the tree, I have a large group of pots containing the herbs I love most and a lot of others I enjoy for their fragrance or use in cooking. They are within easy reach of my kitchen, which is ideal. I planted a cascading Japanese maple in a very large clay pot, and placed it on top of the 2 foot tall stump, thus creating a new staging area in the garden. On the shadier side of the tree stump, I’ve completed my new garden space with a large collection of annuals that are favorites of the birds and butterflies.

This type of herb garden is also something that can be achieved in small spaces. Even a sunny balcony can support a few of your favorite herbs.

Life in the garden is a learning curve and over time I have experimented with many things as I try to find the absolute best way to grow herbs. This time I am using four different potting soils for evaluation. Merrifield, Pro-mix, Espona and Foxfarms. So far they are doing equally well! After I place a piece of landscape fabric over the drainage hole, I incorporate a handful of organic Plantone, and a half handful of Greensand, Rock phosphate, and Gypsum into the soil mix. This has been working well for me, but may not be necessary for all gardeners.  Herbs don’t need too much fertilizer so I will observe to determine whether they need more during the growing season. I always hold the potting mix 2” from the top and cover with 1⁄2” small gravel (⅜” River Jacks) or Pea Gravel will work. This deters squirrels from digging and keep the soil in the pot when watering.

Herb Container Garden Collection

I choose large pots, most in excess of 16” because watering is easier. Small pots require closer monitoring. Water deeply so that the entire root ball is saturated and then again when soil begins to dry. Find that happy medium between too wet and too dry, and maintain with the proper amount of fertilizer. 

Plant the plants you love and will use frequently to cook with. I was born in the deep south where too many things were fried. Herbs came to my rescue and I learned to savor the various flavors they gave to a dish. Yes, fried chicken is a must now and then, but I rarely fry anything now. Salmon grilled with thyme and fresh dill is a party in your mouth!

Several herbs can be planted together in one large pot or the pot can be devoted to just one. I will have fresh young plants waiting in the wings for parsley, dill, and basil as they will not last the full season. I grow several varieties of Basil (sweet, thai, columnar and african), sage, thyme, oregano, chives, rosemary, lavender, and tarragon.

Container Garden with Herbs

Nasturtiums and marigolds provide color, are edible and beautiful garnish.

I did include cherry tomato and a habanero pepper plant. I hope the deer don’t harvest those! Herbs repel somewhat, are not tasty to deer, and cannot be sprayed with Bobbex, a natural spray that saves my other tasty (to deer) plants.

And so, where there is disappointment in a major loss of a big tree, I am now enjoying a particularly attractive and useful garden right under my nose. Yes, there is much fragrance and sensory delight! Harvest frequently and enjoy the organic, chemical free, delightfully tasty and diverse flavors of the garden!

Growing Tomatoes in Containers: A Video Tutorial

Plant specialist David Yost demonstrates the steps for planting tomatoes in containers that can be placed on a patio, balcony or deck.

ISTOCK Tomato

Vegetable Gardens in Small Spaces: Tomatoes

David Yost, Merrifield Plant Specialist

Tomatoes are one of the most popular fruits and vegetables among gardeners as they are both beautiful and delicious! Even if you have limited space, you can grow beautiful tomatoes with a container, adequate sunlight and a little planning.

Tomatoes can grow in a variety of conditions, but will produce the best fruit in a location with 6 to 8 hours of sun per day. Before you begin your tomato container garden, check your yard or patio at a few different times throughout the day to determine the best location for your plant.

Step one: Choose your tomato

You can grow just about any kind of tomato in a container if you are willing to work with vines that can reach 8 feet tall or more. I like to grow the Celebrity variety in containers for its hardiness, flavor and manageable size. ‘Celebrity’ typically grows to about 5 feet, making it a manageable choice.

Step two: Gather your supplies

Before you begin planting, you will want to make sure you have the following items:

  • Container: Your container should be a minimum of 16” in diameter for one tomato plant. With tomatoes, bigger is always better when it comes to containers. Today I’m using a plastic pot, but you can use almost any container as long as it has a hole in the bottom for drainage. You can also use an EarthBox, which has a sub-irrigated watering system that can increase time between watering.
  • Potting soil: We recommend using a lightweight potting soil, such as Pro Mix Organic Vegetable and Herb, for container-grown tomatoes. For one tomato plant in a 16” pot, you will need two 16 qt. bags of potting mix.
  • Small square of landscape fabric: Place this over the drainage hole in the bottom of the pot to prevent soil from escaping and keep your patio clean. This will also prevent critters from coming into the pot.
  • Tomato cage or other support structure: To keep your tomato contained within the pot, we recommend using a tomato cage or a plant stake to support the vine.
  • Fertilizer: I like to use an organic fertilizer, such as Espoma Tomato Tone, for my edible gardens. You can also use an inorganic, slow release granular, such as our Merrifield Flowering Plant Food or Osmocote.
  • Granular lime: I like to mix lime in with my tomatoes to prevent disease and boost growth.
  • Squirrel repellent: I have lots of squirrels in my yard so I use a squirrel repellant to discourage them from tampering with my tomato plant. I like the I Must Garden brand as it’s organic.
  • River jack stones or seminole chips: You’ll use these to cover the top of the container surface. This will protect your plants from squirrels and preventing dirt from washing out of the top of the pot.
  • Hand shovel
  • Gardening gloves
  • Watering wand and hose

Step three: Plant

Since your container can be heavy once its filled with the soil, we recommend setting the container in place before you plant your tomatoes.

  1. Place your piece of landscape fabric over the drainage hole in the bottom of the pot.
  2. Fill your container 2/3 of the way with potting soil.
  3. Add your fertilizer and lime to the potting soil and mix with your hand shovel. Be sure to follow the instructions on the label to determine the appropriate amount of fertilizer and lime to mix in.
  4. Add your tomato plant. Break up the roots and remove the bottom set of leaves before placing your plant in the pot. You can cover your tomato with soil all the way up to the second set of leaves.
  5. Top off the container with soil, but keep it an inch from the top of the container to keep it from spilling over the sides as you water.
  6. Place your tomato cage in the pot. You will want to do this right after planting to prevent the cage from damaging the root system of the tomato.
  7. Cover the surface of the soil with a half-of-an-inch of small river jacks or seminole chips.
  8. As an extra layer of protection, spray your tomato with squirrel repellent.

Step four: Water and nourish

Once your container is set, water it thoroughly. Run the water over your container, letting it drain out of the bottom. Tomato plants need to be watered frequently to maintain consistent moisture in the soil. The soil should not be allowed to dry out. During hot weather, you will likely need to water your tomato plant daily.

For the best tomatoes, we recommend feeding your plant every 2-4 weeks with fish emulsion.

Your plant will be ready to harvest later this summer, and will continue to produce fruit through the end of the season.

Turning a Tiny Backyard into an Outdoor Room

Mary Kirk Menefee, Merrifield Landscape Designer

Outdoor rooms are everywhere. On television, in magazines and on social media, they captivate audiences and elicit dreams of intimate gatherings, meditative solitude or perhaps the ultimate creative work space. Rooms are by definition limited by barriers or boundaries, enclosed and only so large. They are a perfect fit for smaller, more urban properties.

So why do I hear so many homeowners describe their smallish outdoor space in disparaging terms? “It’s just a townhouse backyard.” “I have nothing but a postage stamp.” “It’s small—there’s not much we can do with it.” Sometimes, I hear a hint of shame or a vague tone of apology, as though their little spot of earth isn’t worth good design. To that, I say STOP. Stop right now and begin to look at things a different way.

I also can say, I understand. So many of us who grew up in the suburbs or more rural locales have chosen a more urban setting in which to raise our own families. Our expectations of what a “yard” should be can be stuck in that suburban mold. You know the one: an ample deck or patio leading out to an expansive lawn, just right for a game of touch football, several well-placed shade trees, and maybe a play set or vegetable garden far enough away not to feel obtrusive. Your very own slice of nature. Letting go of that expectation can feel disappointing, but it can also feel like opportunity!

When my husband and I chose our row house in the Rosemont neighborhood of Alexandria, we knew we were choosing against the big yard. With lots of green space in a nearby park where our little boy can play, we don’t miss it. Instead we are designing a space that fits who we are – simply flagstone with areas for cooking, eating and lounging, a kitchen garden, a sandbox and a few ornamental plants. A place that is an extension of our home. A place where we can live.

How to create a beautiful small outdoor space

If the vision of a purposeful space in sync with your lifestyle has your wheels turning, you may need to stop thinking in terms of a disappointing miniature suburban yard and start thinking in terms of an outdoor room. First, consider what defines a room indoors. Indoor rooms generally:

  • Have a distinct purpose and have what they need to fulfill that purpose.
  • Use the whole space, wall to wall and floor to ceiling
  • Have a logical connection to adjacent rooms
  • Contain furnishings that make them useful and comfortable
  • Include details that make them special

When we bring those concepts outside, it’s easy to see that the outdoor portion of your property need not be nature in miniature nor a useless and ignored place devoid of personality. It can be a true extension of your home, treated with the same sense of purpose, design and detail.

To get there, follow these seven tips:

Embrace the space

Let go of trying to make a cozy space feel expansive or preserve a lackluster view—it’s okay if you can’t see the edges of your property so long as you feel good in the space.

Focus

The fewer uses for a space, the easier it will be to create a unified and pleasing design.

Straighten up

Take a cue from indoors—straight lines and angles often (but not always) help to maximize usable space.

Streamline

Built-in seating, planters, storage, etc., can eliminate the need for bulky furniture and allow one piece to serve multiple purposes.

Think vertical

Pay attention to walls and ceilings, both of which are fair game for furnishings, art and plantings.

Details, details

Because, every inch of a small space will be noticed, attention to detail will make it special.

Make peace with maintenance

Plants—the one quintessentially outdoor furnishing—will grow and change. You can use dwarf cultivars to make the job easier, but a lush look will require some artful pruning and extra care for container plants.

Fire Up Your Outdoor Lifestyle

Mary Kirk Menefee, Merrifield Landscape Designer

Are cooling temperatures and shorter days making you think of a cozy gathering around a fire? It’s no wonder. Fires have a primal draw. They are a source of warmth, comfort and hospitality. They engage all of our senses, and as a result, seep into our memories.

For me, a crackling fire harkens back to so many wonderful times and places. When I was very young, my grandmother would take my sister and me to a spot of open land near a creek and teach us how to build a little campfire and roast hotdogs and marshmallows on sticks. She kindled not just fire but a love of the outdoors. Later there were campfire sing-a-longs at summer camp, bonfire pep rallies and gatherings with friends around all manner of campfires and fire pits.

As a designer, I love to have to the opportunity to bring this kind of experience home to my clients. This is good thing, because fire features have become very popular. Every year, I seem to get more requests to create space for a fireplace, fire pit or chiminea in a landscape. Everyone seems to be craving that warm, hospitable place within the garden. What’s more, the warmth of a fire extends outdoor fun well into the late fall and even winter months. You don’t have to move to California to enjoy year-round outdoor living!

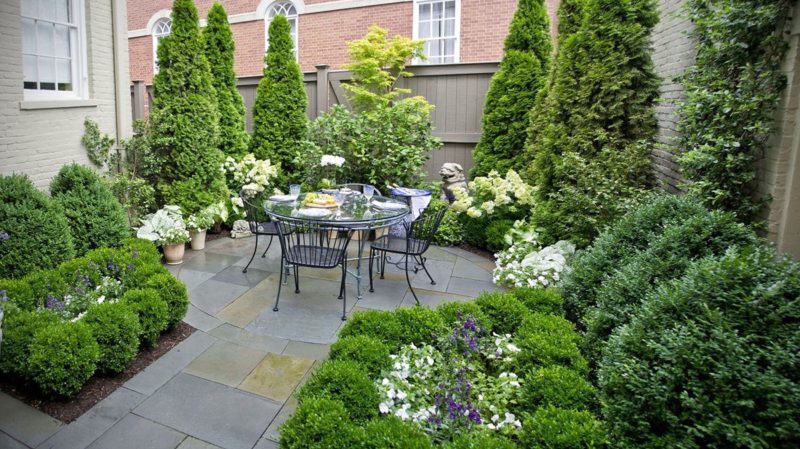
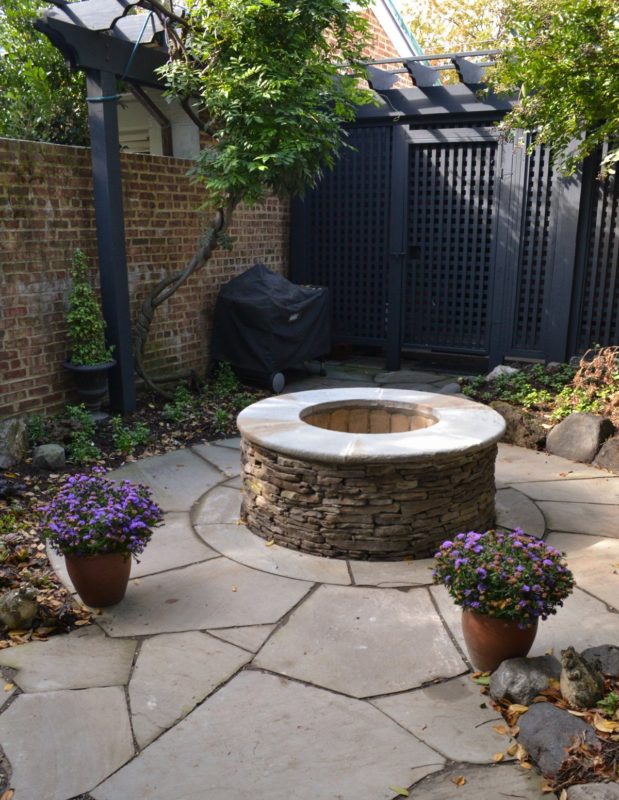
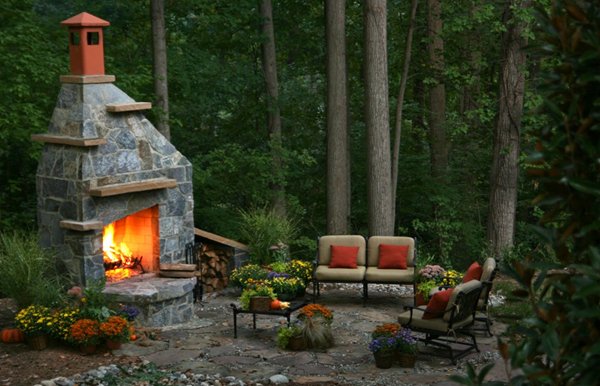
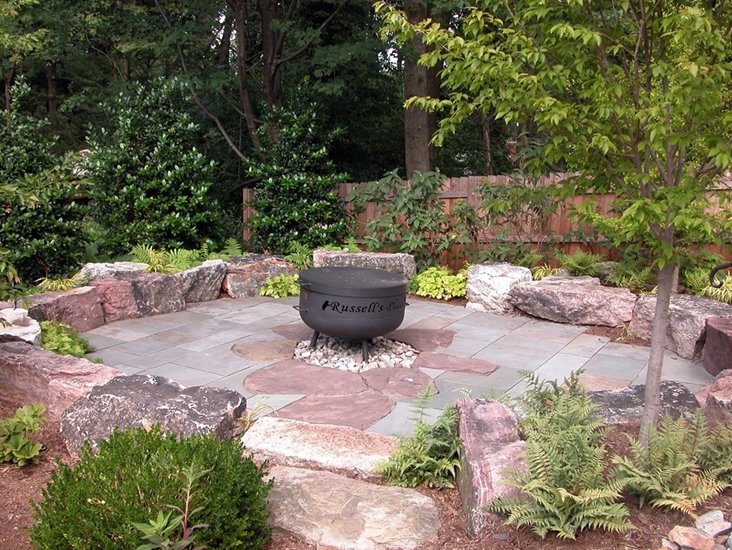
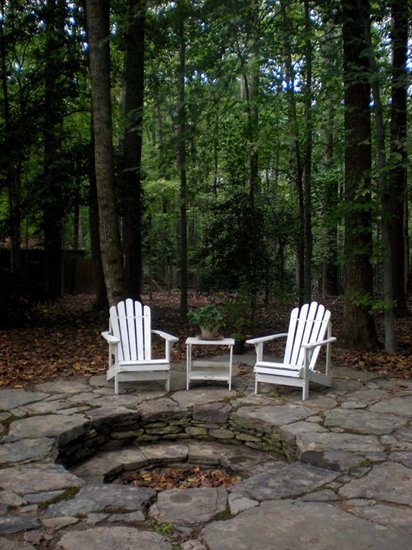
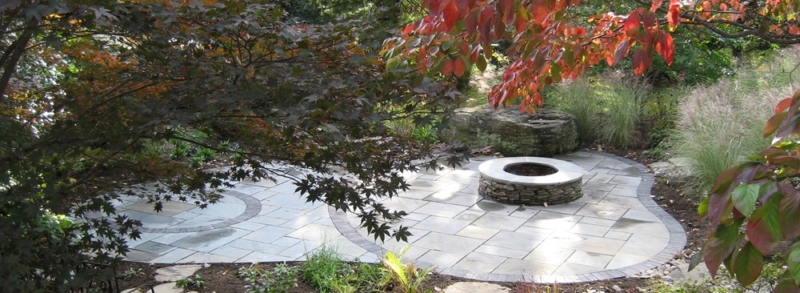
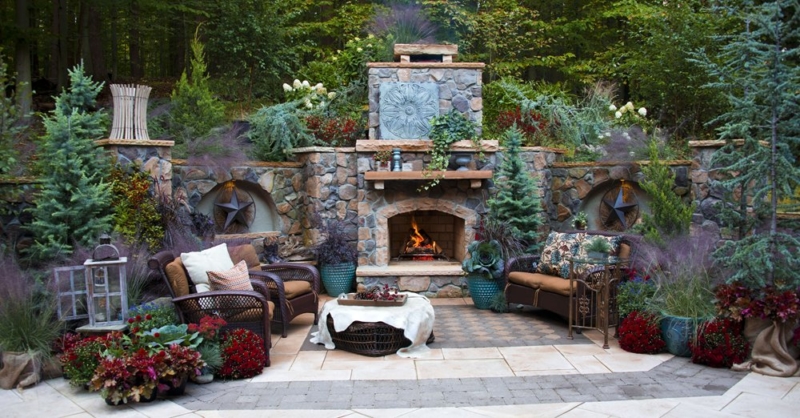
What you do need to do is apply a little thinking, planning and creativity. Options for fire features are nearly limitless, so if you think only of a raised stone circle, think again. As you can see from the photos below, the fire features Merrifield has built in the past few years range from elaborate outdoor living rooms, complete with fireplaces, to rustic camp-style pits to movable fire bowls. Clients who have completed such installations tell me their fire features tend to be some of the best-loved and most-used of their landscape additions.

Looking beyond the DC area, there are even more creative options to discover. In the western US and Australia, where wood-burning fires are largely prohibited, many people opt for gas fire features with sleek, modern designs. With the ability to simply turn them on and off, they fit into all kinds of unexpected places. Check out Pinterest and Houzz for some stunning examples.  Maybe you’ll end up in the vanguard of homeowners bringing this trend to the East Coast. Whatever you do, don’t limit your imagination. A Merrifield Garden Center designer can help make your dream a reality.

When working with a designer on your fire feature, the first two things he or she will consider are the available space and how you intend to use it. While built-in fire pits and fireplaces generally need generous surrounding hardscapes and to be positioned 20-25’ from structures, such as your house, portable fire bowls and chimineas can be used in smaller, closer spaces. In general, it is not recommended to put fire features under roofs or pergolas or on top of wood decks (and yes, believe it or not, that is a common question). Wood burning fire features are ideal for people who want a campfire experience, gas features are better for those who crave the ambiance with a bit more simplicity.

A few questions a designer might ask when planning your fire feature are:

  • How much space do you have/want to dedicate to this particular feature?
  • Do you need this space to be convertible (dedicated to fire for small gatherings, open space for large-scale entertaining)?
  • Is there any space 20-25’ from a structure?
  • Should the space be an extension of your home or a destination out in the garden?
  • How many people would you like to have gathered around the fire?
  • Will you be using the fire for cooking?
  • What factors (e.g., hassle of getting it started, safety concerns, no dry place to store firewood) would prevent you from using the fire feature often?

Once you’ve honed in on the location and the type of fire feature you want, it’s time to think about feeling, style and materials. What feeling do you want to create? The memory of a cozy campfire? A luxurious resort? A romantic retreat? Think about whether the space should feel enclosed and intimate or open and exciting. What aesthetic choices will contribute to that feeling?

As you’ve seen, aesthetics for fire features are as varied as any home or garden. Ideally, the style and scale of your fire feature, home and garden would all be the same—yours!  If your home tends toward cozy and rustic, with exposed beams, lots of natural materials, and a loose woodsy garden, a grand brick chimney might seem out of place. However, it might be the perfect thing for a more formal home with a white-columned pergola and parterred herb garden.

To point to a more concrete example, recently, I designed an outdoor living area with a fireplace to be a true extension of a home. Because the home sits on a steep hill within a woodland of tall trees, the living area and the fireplace needed to be bold, with large proportions, to be in scale with their surroundings. They also needed to be one with the house to avoid looking tacked-on. To get this seamless look, we used a stone veneer that was already on the house to cover the fireplace and adjacent retaining walls. The bold proportions come from chunky, rough-hewn stone for benches and wall caps and large-scale pavers for the patio that echo the colors in the veneer. The result is very cohesive, as though the outdoor area was built right along with the house.

What are the stylist hallmarks of your home’s character that you can transport into the landscape with a fire feature and surrounding patio or garden?

Here are a few aesthetic notes to look for:

Materials

  • Stone – notice color, texture and visual weight
  • Brick – notice color, finish and age
  • Stucco/Dryvit – notice color and relationship to other materials
  • Copper – notice patina and degree to which it gives the house character
  • Wrought Iron – notice it’s shape and stylistic details

Style

  • Formal – look for symmetry, heavier, traditional materials, classical details
  • Rustic – look for natural materials and details, situation within the landscape, feelings of “woodsiness” or “beachiness”
  • Modern – look for clean lines, spare or quirky details, asymmetrical and nontraditional spatial relationships.

Having a location, type, scale and feeling in mind and a few stylistic details for inspiration, you are ready to create the perfect place to warm those chilly evenings in the coming months. Invite some friends … open a bottle of wine. What could be better?