 Bryn Wallace
Pretty In Pink Early Spring Container
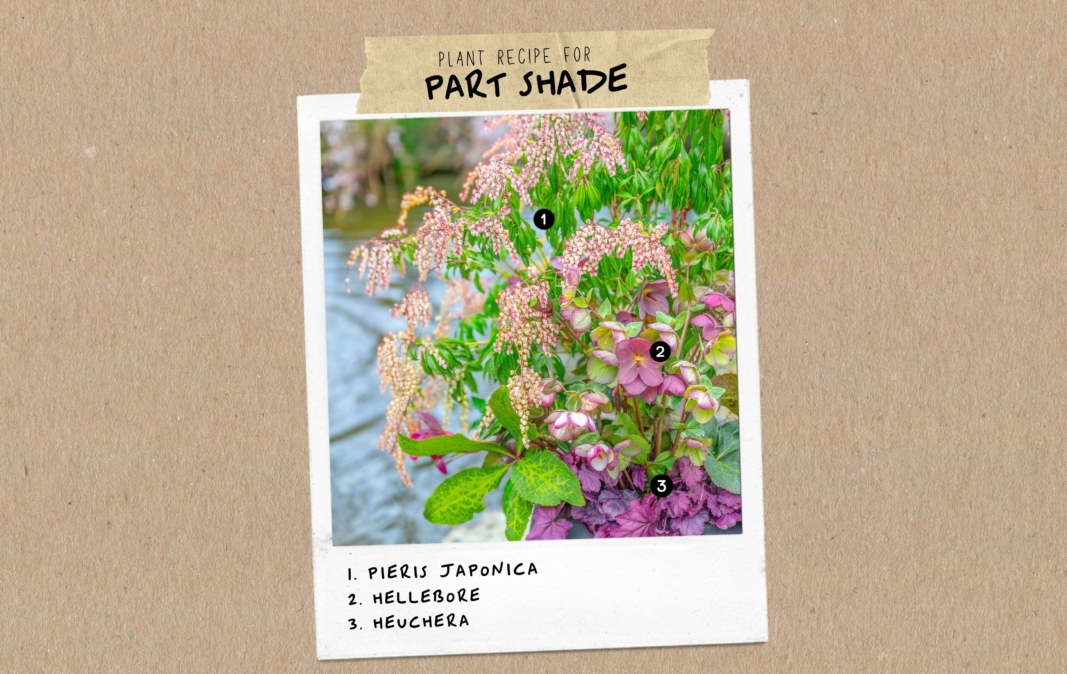
This container is pretty in pink with lovely weeping pieris japonica complemented by the beautiful blooms of helleborus and textured foliage of heuchera. The pieris japonica shrub is the main attraction, giving the container height and lushness with striking year-round foliage. Once the spring blooms fade you can also easily plant components of this container directly into the garden and add new seasonal blooms. Or, overwinter the entire container and enjoy the blooms again next year. This container will thrive in part shade, protected from the hot afternoon sun.
Plants Featured
Pieris Japonica
This evergreen shrub produces colorful, wispy, weeping flowers in shades of white, pink or red in the spring. Its lush, evergreen foliage will provide a nice background for seasonal blooms in the cooler months. Once it is done flowering, remove the spent blossoms using clippers. This will allow the plant to focus its energy on producing additional leaves and let the beautiful foliage take center stage. If you decide to remove it from the container and plant it in the garden at any point, pieris japonica enjoys part shade.
Helleborus
Helleborus are evergreen perennials with beautiful foliage and blooms that hang from sturdy stems early winter through spring, typically from December through April in our area. They come in all different colors including apricot, pink, purple, white and yellow. After they are done blooming, their attractive greenery remains. If you wish to transplant your helleborus from the container to the garden, find an area with part shade away from hot afternoon sun, such as under a deciduous tree.
Heuchera
This perennial plant is evergreen and this variety has beautiful burgundy/purple foliage. There are other varieties with orange, blush, chartreuse and multi-colored foliage. In the spring it produces long stems with delicate white and pink flowers that dance above the foliage. When it’s done blooming, we recommend cutting the flower stalks back so more energy can go to producing leaves. If you wish to plant heuchera in the garden, it will thrive in part shade away from the hot afternoon sun.
Planting Instructions
If you’re looking to replicate this container in your own home, here are our recommendations for planting containers successfully.
1. Select a container. Choose a container with drainage holes. This allows excess water to drain out of the bottom of the pot, letting the roots take in the oxygen they need to survive. When choosing a container, consider the size of the plants you’re planning to put into it. You want to allow plenty of room for root growth. The larger the pot, the more soil you can use, meaning there is more room for growth and it is easier to keep that soil moist.
2. Add Merrifield Potting Mix. We recommend using a well draining potting soil to allow adequate moisture and oxygen balance for optimal plant health. Before you pour in your soil, place a piece of landscape fabric or a coffee filter over the drainage holes in your container. This will prevent soil from leaking out of the holes. Add Merrifield Potting Mix until the container is around ⅔ full.
3. Add a slow release fertilizer. Mix a slow release plant food, such as organic Plant Tone, into the soil. This will provide a continual release of nutrients for your plants to thrive. Follow the instructions on the bag for the amount of fertilizer to add based on the size of your container. We recommend top dressing once or twice during the growing season with Plant Tone or a liquid fertilizer.
4. Add your plants. Before placing your plants into the soil, we suggest arranging your plants in their growers pots to see what the layout will look like when they are planted. Then, working with the tallest plant first, pieris japonica in this instance, remove the growers pot and loosen the roots, tucking the plant into your fertilized soil. Continue planting with the heuchera and helleborus in the same way. As you’re planting, you can tuck in more potting soil as you need it. The goal is to keep the soil around 1” below the lip of the container when you are finished planting.
5. Top dress your container. Use decorative rocks or mulch in a thin layer over the surface of your soil to help retain moisture, keep critters out of the soil, and keep the soil in the pot when watering.
6. Water thoroughly. After everything is planted, water thoroughly until the soil is moist and water comes out of the drainage holes of your container. If you’re placing the container on a wood surface like a deck or a balcony, we suggest using a saucer, plant toes or plant feet to keep the container lifted off of the ground so that excess water doesn’t collect under your pot and potentially damage your surface.
7. Fertilize throughout the growing season. We recommend reapplying Plant Tone two or three times during the growing season, sprinkling it directly on top of the soil. If you’re using a decorative soil cover, push it aside to place the Plant Tone directly on the soil surface. Follow the instructions on the bag for the amount to apply for continual feeding.
Ongoing Care
Watering
The plants in this container will thrive with moist soil. You do not want the soil to completely dry out or remain soaking wet. In general, you will likely need to check the soil for water every 1 to 2 days. Use your finger to reach into the soil a few inches deep and feel if the soil is wet or dry. If the soil is beginning to dry out, water thoroughly until the soil is totally saturated and feels like a soaking wet sponge and water runs through the drainage holes of the container.
Overwintering
In our area, plants potted in containers do not always survive the cold winter months, depending on the weather. If you’d like to keep your container planted to enjoy year-after-year, we recommend elevating the container off the ground using plant toes, plant feet or a plant stand and wrapping the container in bubble wrap and a swag of burlap. The burlap is purely for decorative reasons so you don’t have to look at bubble wrap. If you’re over wintering a group of containers, you can place them close together and use bubble wrap or mulch to insulate the group. On days when we have warmer temperatures of 40 degrees F or higher, water your container(s) thoroughly.
 Photo by Bryn Wallace